

|
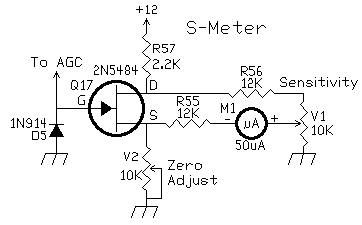
The "To AGC" is connected to the AGC line. The diode at the gate of the 2N5486 protects the gate from transients that might destroy the FET. This happened a couple of times while working on the prototypes. Since the diode was installed there have been no problems. As the AGC is turned on, lowering the AGC voltage, the FET begins to turn off. This lowers the voltage at the source of the FET, and current begins to flow through the S-Meter through V2, the 10K variable resistor connected to the source of the FET. Setting the "Zero Adjust" to low resistance readings can bring the AGC voltage to zero. Best setting for the "Zero Adjust" pot is halfway or above. R55 and R56 can be changed to work with different value S-Meters. S-Meters up to 200 microamp can be used by changing these values. For S-Meters over 200 microamp, R57 may need to be lowered to provide enough current for the S-Meter to reach full scale. For a 250-0-250 uA meter, center reading, the value for R55 is 4.7K, and the value for R56 is 10K. For a 200 uA, or a 250uA meter, the value for R55 is 22K, and the value for R56 is 100 ohms. For a 1 ma meter, R57 is removed and 470 ohm resistors are used at R55 and R56. Adjusting the S-Meter____Have a clip lead connected to the AGC line, the other end will be grounded at the appropriate time to help adjust the S-Meter. ____Adjust both the Zero Adjust and the Sensitivity trim pots all the way counter clockwise. The S-Meter should be reading almost full scale. ____Move the Zero Adjust trim pot counter clockwise until a zero reading is obtained. ____Ground the AGC line with the clip lead, the S-Meter should be off scale to the right. ____Move the Sensitivity pot till full scale reading is obtained. ____Remove the clip lead from Ground. The S-Meter should be off scale to the left. ____Move the Zero Adjust pot counter clockwise until a zero reading is obtained. ____Ground the AGC line with the clip lead, the S-Meter should show full scale reading. ____If more sensitivity is desired, turn the Sensitivity pot counter-clockwise until the desired sensitivity is obtained. Having a signal tuned in will make this adjustment easier. At the more sensitive positions, the S-Meter will read past full scale when the AGC is grounded. Readjust the Zero pot so that it reads zero at no signal. |

|
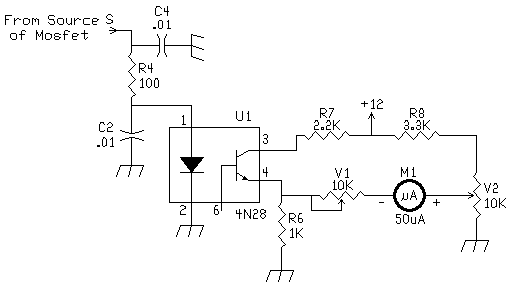
An optoisolator is substituted for one of the LED's in the 455kHz IF strip to provide an S-meter. Two optoisolators that have worked very well are the 4N25 and the 4N35. The 4N25 gives greater response than the 4N35 because it responds at a lower threshold. They all use the same pin connections. Others will work, so if you have any in your junk box, try them out. You can scrounge them off old modem boards. You can recognize them by their 6 pin layout and most of their part numbers start with "4N" or "6N". I have found that any meter from 200 microamp sensitivity on down will work in this circuit. Surplus CB radio meters work great. Adjusting the S-meter is simple. Ground the AGC line on the IF strip, then adjust the full scale variable resistor for full scale reading on the meter. With the antenna disconnected, adjust the zero variable resistor for zero reading on the meter. The controls interact, so you may need to go back and forth to get it set right. ReferencesSome S-meter sites to check out are the following: |
Send E-Mail || Amateur Radio Receivers || Super Receiver || Super Receiver Circuit Details